So you’ve said your mental farewell to the idea of getting a dog and opted instead for a miniature crustacean. Unlike a dog, you will save a fortune on time and money with these incredible, low-maintenance invertebrates. They do however differ in care quite a bit from your typical dog, cat, or hamster.
So if you want to know how to care for a rubber ducky isopod of your own, you will get all the information you could ever want and more from this article! We will discuss setting up a culture, how to be a good, attentive isopod caretaker, what exactly to feed the little armored fellas, and much much more.
Situate yourself in a damp, dark environment and get cozy as we go over exactly how to set up an isopod culture of your very own!

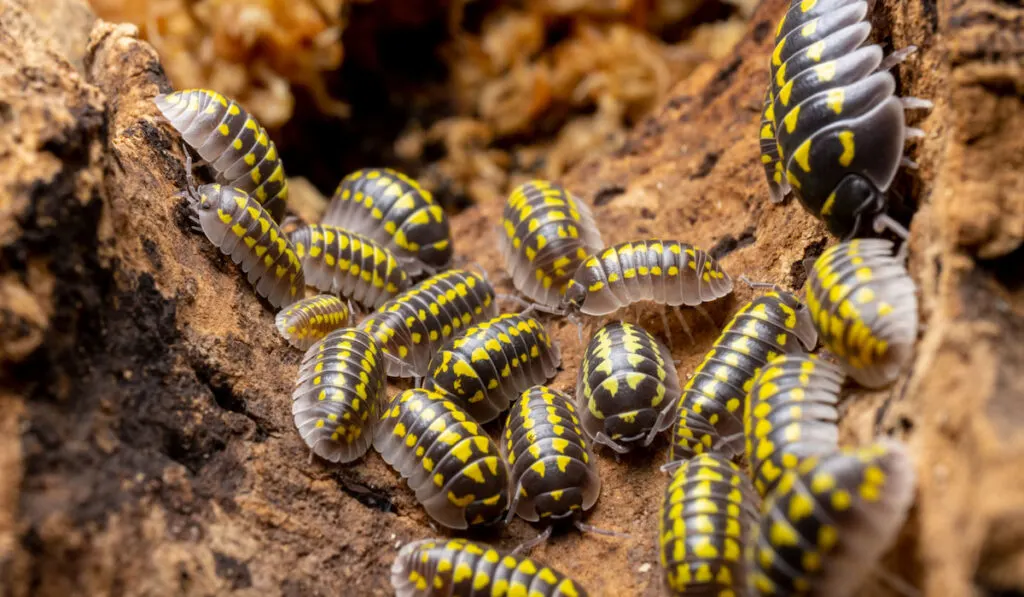
Table of Contents
Setting Up an Isopod Culture
Container
To start making your culture, you will need a plastic container to store the isopods and their personal ecosystem. This container is recommended to be at least six quarts but you want to make sure it is cozy enough that it encourages breeding between the individual isopods.
Make sure to poke small holes around the side of the plastic container (this is only if you plan to stack enclosures, otherwise the top is acceptable) or a larger two-inch hole with screen netting to allow oxygen in.
Substrate
When looking for a proper substrate, there are different schools of thought on what is the perfect mixture to use. A general rule of thumb is to use things that can retain moisture so your isopods do not dry out.
The substrate will also be a nutritious alternative food source for your invertebrate buddies, so choose something that can provide nutrients to your isopods.
The first thing to get for your substrate is something known as coco fiber, which should be appropriately damp but not overly wet. Coco fiber will help provide nutrients to your culture and promote aeration.
Add sphagnum moss to that, which also promotes aeration and will help beginner caretakers keep their cultures from drying out.
Next, you will want to spread a crumbled-up layer of leaf litter over that. The thickness of the crumbled pieces is not incredibly important.
As long as the leaves you use are safe for isopods, you can go as cheap as using oak leaves you find around the neighborhood, as long as you disinfect them. The big thing to steer clear of is pesticides, which can be lethal to your new crustacean companions.
If you are going to incorporate springtails into your culture, you should also mix carbon into the substrate.
Once you have all of this inside your container, mix it all up until it is thoroughly blended together throughout. Then put on a top layer of leaf litter above the mixed substrate.
Finally, you are going to need to offer a place for the isopods to hide. Most experienced caretakers recommend cork bark, but rotting wood will also suffice in a pinch.
This is primarily where you will be able to find them, hiding underneath the surface of the cork bark or rotting wood. Once all these steps have been taken, you are now ready to move your isopods into their new dream home!
Storage


Isopods are fairly easy to keep happy when it comes to where they are stored.
Typically speaking, if your home stays somewhere in the 70s then you don’t have to worry much as this is a perfect temperature to keep them in. If not, you can use a heat mat to make sure they get the warmth they need to thrive.
Most folks will then keep them in a darker area of the house like a closet or a windowless room. This is due to them being nocturnal creatures who prefer as little light exposure as possible.
Depending on how dry a climate it is where you live, you will need to spray down the inside of the culture one to three times a week to keep the humidity high internally.
What Do Isopods Eat?
Isopods are known as detritivores, or creatures that feed on decaying plants or organic substances. They will also consume the fecal matter of other animals which opens up the possibility of cohabitation with other animals that would enjoy similar enclosures.
To help you better understand what to include in these affable insects’ diets, we will go over the majority of things that an isopod will consume!
Leaf Litter
Leaf litter will make up most of what these little guys will consume.
If they are not in an enclosure with plants then you will need to make sure you replenish their leaf litter when it begins to grow scarce as they will consume all of it over time.
They will even go after live plant fibers if the leaves are suitable to their palette.
If your leaves begin to smell of ammonia, remove them. Keepers have found that these leaves can and will kill your isopods.
Decaying Organic Matter
If you had to give these critters an occupation, they would more than likely be the janitors of the animal kingdom. These guys will go after all dying matter, which ranges from the leaf of an oak tree all the way to the carcass of an expired animal.
They will eat every part of the organic matter as well. There are several studies that show that the isopods will even take care of the fur on a dead animal after a long enough period of time.
Fish Flakes, Shed Reptilian Skins, and Animal Waste


These all probably seem very strange being grouped together, as they all seem quite different. But they all serve a purpose—to provide protein to your culture.
Keepers have found that a civilization of isopods will begin to stagnate if they are not given a proper amount of protein which can be found in these three very different food sources. Fish flakes will work if your isopods are in an enclosure by themselves.
If you choose to cohabitate them with lizards then they may get the protein they need without external additions. The shed skin of reptiles and the excrement of most animals will work fine as a source of protein.
It may be helpful to check what you are feeding the other animals though, to ensure that the food source has a healthy amount of protein for not only your other animal but the isopods themselves.
Cuttlebone
Another fantastic source of calcium, the cuttlebone is a very good alternative to eggshells or calcium tablets. It is softer than other bone alternatives which can be used, but they take a notoriously long time to decompose.
The cuttlebone, however, is far more malleable and before long it will be thoroughly ravaged by the isopods in your culture.
Elk horn is another possibility that has garnered some attention of late from isopod keepers, but it still takes much longer to decompose than cuttlebone.
Egg Shells
What else are you gonna use them for? Simply make sure that any yolk or goo left inside the shell is dried out and place the crushed up shell inside the container.
This is great if you do not want to purchase calcium tablets for your isopods and can serve as an excellent source of the nutrient without breaking the bank.
It is very important that you allow the goo or fluid found inside the eggshell to dry out. Failing to do so can result in isopods getting glued down because of the stickiness of the fluid and will result in isopod fatalities.
Produce
I put this one at the bottom because it is the most non-essential to your isopod ecosystem.
While you certainly do not need sliced zucchini and pineapples to make your isopods live long and healthy lives, it may help encourage a bigger population amongst your isopods.
The only thing you will want to not use is potatoes, as they can distribute carbon dioxide which may kill isopods.
A piece of fruit or two every now and then can actually help increase the size of your isopod population overall. When you consider how expensive these guys can be, fruit can help give you the most bang for your buck!
Due to the pesticides found on some produce, it is encouraged to at least rinse them off before giving them to isopods. You wouldn’t want an apple with the refreshingly bitter chemical taste of Thiabendazole and neither would your isopods.
Culture Upkeep and Concerns

Once you know how to set up your culture, you will inevitably have to maintain it.
Now, compared to other pets, isopods are pretty independent and very low maintenance. Despite this, you will still need to water them and switch out their substrate from time to time.
How much you water your isopod culture is entirely dependent on what part of the globe you are in. Some experts recommend one to three times per week. But if you live in a desert area or a particularly arid climate, you might have to water their substrate daily.
Ideally, you should make sure that your substrate stays humid and moist and avoids drying out, which can harm your isopods.
How often you change the substrate is largely dependent on how big your culture is. For a starter culture, you can wait anywhere from six months to a full year.
A larger culture that has hundreds to even a thousand isopods in it will need to be replenished with fresh substrate every three to four months.
Once your substrate has been used up, you wanna make sure you either transfer the entire population of your culture into a new container or manually remove the isopods and replenish the current one.
If you are going to switch out containers, it is recommended that you are careful with the soil so as not to kill any baby isopods while transferring them over. Some will be hidden inside the used substrate.
When you do finally move your isopods to a new container or remove the old substrate from your current container, you will need to dispose of the old substrate.
Adding new soil may include heating the soil in a microwave or placing it in a freezer to remove any harmful chemicals or bacteria according to USDA recommendations.
The process of replacing substrate can be very time-consuming and tedious, though it is a vital part of keeping isopods healthy and happy.
Leaf litter replenishment is more of a visual task. Instead of setting dates on your calendar telling you to add new leaf litter, be sure to check your isopod culture to make sure they have not run out of leaves to nibble on.
When you see that the amount of leaf crumbs is very low or nonexistent, it is time to add more into your container.
If you find that your container is growing mold and does not seem to be stopping, you should increase the amount of ventilation in the culture. Take out anything inside that has visible, growing mold, and make sure nothing else looks to be heading in the overripe direction.
You should then either place more holes throughout the enclosure or add another two-inch hole with screen netting.
Conclusion
For busier folks or first-time pet owners, isopods are an incredible choice to have in your home. These fascinating little guys are endlessly interesting and very easy to maintain.
So grab yourself some dried-up leaves and get to crafting a culture of your own!